07 - Printing to the Console
To see the test output on the console, we need to send the data from our kernel to the host system somehow. There are various ways to achieve this, for example, by sending the data over a TCP network interface. However, setting up a networking stack is quite a complex task, so we will choose a simpler solution instead.
Serial Port
A simple way to send the data is to use the serial port, an old interface standard which is no longer found in modern computers. It is easy to program and QEMU can redirect the bytes sent over serial to the host’s standard output or a file.
The chips implementing a serial interface are called UARTs. There are lots of UART models on x86, but fortunately the only differences between them are some advanced features we don’t need. The common UARTs today are all compatible with the 16550 UART, so we will use that model for our testing framework.
We will use the uart_16550 crate to initialize the UART and send data over the serial port.
To add it as a dependency, we update our Cargo.toml and main.rs:
# in Cargo.toml

[dependencies]
uart_16550 = "0.2.0"
The uart_16550 crate contains a SerialPort struct that represents the UART registers, but we
still need to construct an instance of it ourselves. For that, we create a new serial module with the following content:
// in src/lib.rs

pub mod serial;
// in src/serial.rs

use uart_16550::SerialPort;
use spin::Mutex;
use lazy_static::lazy_static;

lazy_static! {
    pub static ref SERIAL1: Mutex<SerialPort> = {
        let mut serial_port = unsafe { SerialPort::new(0x3F8) };
        serial_port.init();
        Mutex::new(serial_port)
    };
}
We use lazy_static and a spinlock to create a static writer instance. By using lazy_static we can ensure that the init method is
called exactly once on its first use.
Like the isa-debug-exit device, the UART is programmed using port I/O. Since the UART is more complex, it uses multiple I/O ports
for programming different device registers. The unsafe SerialPort::new function expects the address of the first I/O port of the
UART as an argument, from which it can calculate the addresses of all needed ports. We’re passing the port address 0x3F8, which
is the standard port number for the first serial interface.
To make the serial port easily usable, we add serial_print! and serial_println! macros:
// in src/serial.rs

#[doc(hidden)]
pub fn _print(args: ::core::fmt::Arguments) {
    use core::fmt::Write;
    SERIAL1.lock().write_fmt(args).expect("Printing to serial failed");
}

/// Prints to the host through the serial interface.
#[macro_export]
macro_rules! serial_print {
    ($($arg:tt)*) => {
        $crate::serial::_print(format_args!($($arg)*));
    };
}

/// Prints to the host through the serial interface, appending a newline.
#[macro_export]
macro_rules! serial_println {
    () => ($crate::serial_print!("\n"));
    ($fmt:expr) => ($crate::serial_print!(concat!($fmt, "\n")));
    ($fmt:expr, $($arg:tt)*) => ($crate::serial_print!(
        concat!($fmt, "\n"), $($arg)*));
}
The implementation is very similar to the implementation of our print and println macros. Since the SerialPort type already
implements the fmt::Write trait, we don’t need to provide our own implementation.
Now we can print to the serial interface instead of the VGA text buffer in our code:
// in tests/stack_overflow.rs
use siso_os::{serial_print, serial_println};

#[no_mangle]
pub extern "C" fn _start() -> ! {
    serial_print!("stack_overflow::stack_overflow...\t");

    siso_os::gdt::init();
    init_test_idt();

    // trigger a stack overflow
    stack_overflow();

    panic!("Execution continued after stack overflow");
}

extern "x86-interrupt" fn test_double_fault_handler(
    _stack_frame: InterruptStackFrame,
    _error_code: u64,
) -> ! {
    serial_println!("[ok]");
    exit_qemu(QemuExitCode::Success);
    loop {}
}
// in src/lib.rs
pub fn test_runner(tests: &[&dyn Testable]) {
    serial_println!("Running {} tests", tests.len());
    for test in tests {
        test.run();
    }
    exit_qemu(QemuExitCode::Success);
}

pub trait Testable {
    fn run(&self) -> ();
}

impl<T> Testable for T
where
    T: Fn(),
{
    fn run(&self) {
        serial_print!("{}...\t", core::any::type_name::<T>());
        self();
        serial_println!("[ok]");
    }
}
Note that the serial_println macro lives directly under the root namespace because we used
the #[macro_export] attribute, so importing it through use crate::serial::serial_println will not work.
QEMU Arguments
To see the serial output from QEMU, we need to use the -serial argument to redirect the output to stdout:
# in Cargo.toml

[package.metadata.bootimage]
test-args = [
    "-device", "isa-debug-exit,iobase=0xf4,iosize=0x04", "-serial", "stdio"
]
When we run --test stack_overflow now, we see the test output directly in the console:
    Finished `test` profile [unoptimized + debuginfo] target(s) in 0.15s
    Running tests/stack_overflow.rs (target/x86_64-siso_os/debug/deps/stack_overflow-ed86b66e22b51540)
    Building bootloader
    Finished `release` profile [optimized + debuginfo] target(s) in 0.05s
    Running: `qemu-system-x86_64 -drive format=raw,file=/../target/x86_64-siso_os/debug/deps/bootimage-stack_overflow-ed86b66e22b51540.bin -no-reboot -device isa-debug-exit,iobase=0xf4,iosize=0x04 -serial stdio`
    stack_overflow::stack_overflow...   [ok]
However, when a test fails, we still see the output inside QEMU because our panic
handler still uses println. To simulate this, we can change the assertion in
our trivial_assertion test to assert_eq!(0, 1) and running cargo test:
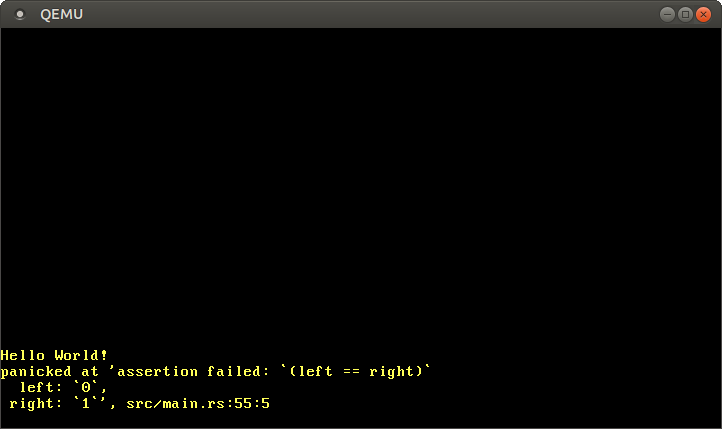
We see that the panic message is still printed to the VGA buffer, while the other test output is printed to the serial port. The panic message is quite useful, so it would be useful to see it in the console too.
Print an Error Message on Panic
Update the test_panic_handler function:
// in src/lib.rs
pub fn test_panic_handler(info: &PanicInfo) -> ! {
    serial_println!("[failed]\n");
    serial_println!("Error: {}\n", info);
    exit_qemu(QemuExitCode::Failed);
    loop {}
}
We now use serial_println instead of println and then exit QEMU with a failure exit code.
Note that we still need an endless loop after the exit_qemu call because the compiler does
not know that the isa-debug-exit device causes a program exit.
Now QEMU also exits for failed tests and prints a useful error message on the console:
    Finished `release` profile [optimized + debuginfo] target(s) in 0.70s
    Running: `qemu-system-x86_64 -drive format=raw,file=/../target/x86_64-siso_os/debug/deps/bootimage-siso_os-5b97ccea1d412d57.bin -no-reboot -device isa-debug-exit,iobase=0xf4,iosize=0x04 -serial stdio`
    Running 1 tests
    siso_os::trivial_assertion...   [failed]

    Error: panicked at src/main.rs:71:5:
    assertion `left == right` failed
    left: 0
    right: 1
Since we see all test output on the console now, we no longer need the QEMU window that pops up for a short time. So we can hide it completely.
Hiding QEMU
Since we report out the complete test results using the isa-debug-exit device and the serial port, we don’t
need the QEMU window anymore. We can hide it by passing the -display none argument to QEMU:
# in Cargo.toml

[package.metadata.bootimage]
test-args = [
    "-device", "isa-debug-exit,iobase=0xf4,iosize=0x04", "-serial", "stdio",
    "-display", "none"
]
Now QEMU runs completely in the background and no window gets opened anymore. This is not only less annoying, but also allows our test framework to run in environments without a graphical user interface, such as CI services or SSH connections.
Acknowledgment
This lab is based on the Writing an OS in Rust series from Philipp Oppermann.